构建自己的云工具
本文介绍如何构造自己的私有云工具,其功能包括分享、全文检索和在线编辑等功能
这里需要强调一点,我搭建下面的服务主要用于个人日常学习使用,没有频繁下载大文件的需求,对流量需求并不大,所以我购买阿里云服务时流量是按量付费。应用场景满足所有开源工具的开源协议
Why
-
广告是互联网的灵魂,但我不想看广告
-
互联网没有隐私,那是因为我用的是别人的服务
-
通过构建服务温故知新,锻炼一下自己的实际操作能力
需求
| 需求 | 三方服务 | 开源工具选型 | 功能 | 内存消耗 |
|---|---|---|---|---|
| 博客 | cnblog 很好用 | Hugo&Nginx | 静态 Web | 100MB |
| 搜索 | 谷歌 CSE 需 FQ | yacy | 开箱即用的 web 搜索引擎 | 500MB |
| 笔记&Wiki | VIP 100元/年 | typora+seafile | 文件同步&搜索&wiki&在线Word编辑 | 4GB |
| 图床 | PicGo + OSS | 暂无必要 | - | - |
| 文件存储 | 百度网盘VIP 200元/年 | filebrowser | 浏览器访问与上传/下载文件 | 50MB |
| CAS | 3M/maxima | Jupyter + scipy | 数值计算&绘图&符号计算 | 100MB |
| Code Server | Code Server | 网页版 vscode | 500MB |
工具与原理
下面图片截取自其他博客,这里感谢原作者~
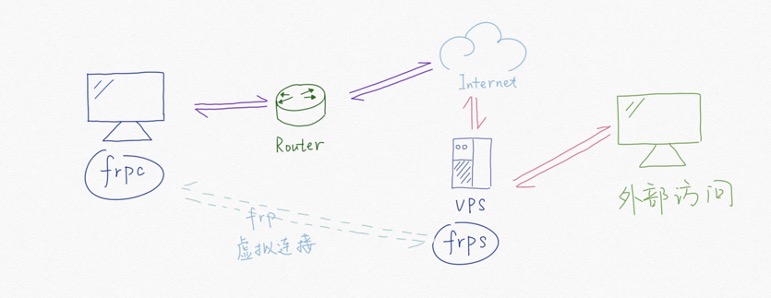
- 闲置 PC + Ubuntu + Docker,闲置的计算资源 & 简洁的软件部署与服务隔离。闲置 PC 需要安装 frpc 客户端,并通过配置实现与 VPS 中的 frps 服务端通信
- 阿里云 / 腾讯云域名服务,购买自己喜欢的域名
- Let’s Encrypt,域名 HTTPs 免费证书 & 通配符域名证书
- VPS(阿里云 ECS 或者腾讯云 VPS) + Nginx + FRP,外网流量转发
- VPS 提供公网 IP,实现外网访问能力与流量转发
- Nginx 实现代理,转发 HTTPs 请求到内部 HTTP 服务。下文给出了 Nginx 配置示例,实现了单 IP 对应多个不同域名的功能
- FRP 实现网络隧道,打通 VPS 和闲置 PC 网络,即上图中的虚拟连接
成本
闲置 PC + 低配 VPS
阿里云最便宜的突发型 ECS(CPU 基准为 20%,超过 20% 将消耗额外资源,流量按使用量付费,5 年费用在打折期间大概 500 元),使用阿里云 PTS 压测,系统在 HTTPs 请求 15QPS 时 VPS 的 CPU 使用率稳定在 20% 左右,搭设自己使用的服务在性能上是完全没问题的
根据我自己的使用情况,一个月流量费最高 9.8 元,平常 5 元/月,假设流量费一年 60 元。为避免恶意访问,VPS 需要设置每天流量消耗上限,下文提供了一些工具
我的电脑和路由器正常情况下功率低于 30W,电费按 0.7 元/度算,一年电费小于 200 块。其他费用,比如域名大概每年二十块。这样算起来我一年需要花费 400 元左右
我的闲置笔记本 6 核 12 线程 32GB 内存,日常 12% CPU使用率和 24GB 内存占用,1min/5min/15min 的负载一般在 1.5;VPS 只作为流量转发(只有 Nginx 和 FRP 服务),对性能要求较低,我的 VPS 单核 512MB 内存,CPU 使用率一直在 5% 左右,1min/5min/15min 的负载一般在 0.2 以内
只使用 VPS
如果不想自己维护硬件,直接购买阿里云或者腾讯云服务也是不错的选择。下面图片截取自阿里云, 4核心16GB40%CPU基准流量按使用量计费的云服务器,5年价格为 6600 元。16GB 内存对我而言已经是最低的要求了

优秀开源工具
Hugo
Hugo,将 Markdown 文件转换为静态网页,结合 Nginx 可以实现静态网站。本网站就是使用 hugo 构建的,细节可以参考我的另一篇博文
Yacy
yacy,开箱即用的自定义搜索引擎,安装配置非常方便,当前网站的 search site 即基于 yacy
Seafile
Seafile,三个主要功能:文件同步与全文搜索 / 个人 Wiki 与全文搜索 / 在线 Word 编辑。三个用户以内,Seafile 的搜索和 Word 编辑功能是免费的
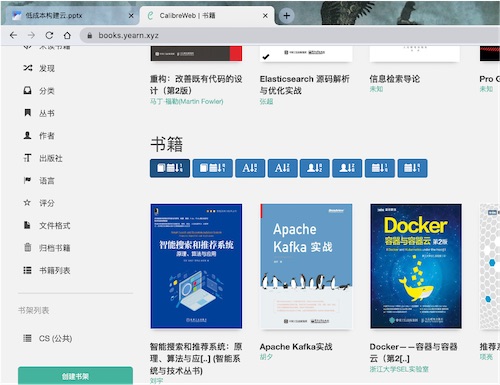
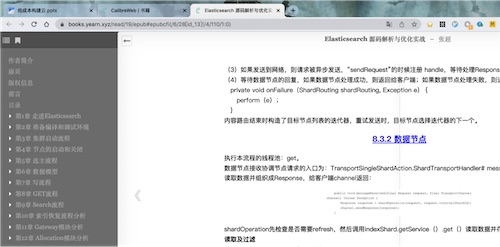
Calibre-Web
Calibre-Web,开源 web 图书管理工具
filebrowser
filebrowser,web 远程文件管理与下载工具
Gogs
Gogs,搭建自己的 github 服务。国内访问 github 太慢,可以自己搭建 gogs + VPN 实现部分仓库镜像。当然也可以使用 Gitee
Monitorix / Elastic Stack
Monitorix 是轻量级 Linux 系统监控软件,指令行即可安装;Elastic Stack 则是重量级监控工具,功能更丰富,细节请参考官方示例
Code Server
使用 code server 可以实现网页版 vscode,可以使用源码、docker、二进制包等方式安装,细节请参考官网
编写 c++,网页版 vscode 可以安装 clangd server。clangd 使用代码根目录下的 .clangd 文件进行配置,示例如下:
CompileFlags:
  Add: [-xc++, -Wall, -std=c++20]
  Remove: -W*
  Compiler: clang++
Online Judege
hustoj / 青岛 OJ 支持 Docker 一键安装,安装完后可以下载免费题目或者购买付费 tk 题库
docker run -d --name hustoj \
		-p 12388:80 --restart=always \
        -v /xyz/abc/hustoj/data:/volume \
        registry.gitlab.com/mgdream/hustoj
VPS 网络流量限制
我在 VPS 中使用 vnstat 2.6、wondershaper 和 Python2 脚本加上 crontab 实现了流量限制,Python2 脚本如下所示。下面先对配置参数做简单的介绍
valid_itf_id,VPS 中会产生公网流量的网卡 ID。阿里云只收取 VPS 流出公网的流量费用,我的 VPS 只有 eth0 会产生公网流量daily_max_traffic,一天内公网流量使用上限,为了方便,我没有区分公网的出入流量区别limit_cmd,当前命令会设置 eth0 网卡的带宽。默认情况下 eth0 支持 100mbps 网速,带宽占满的情况下一分钟将产生近 600MB 流量(0.5 元)。当天流量使用达到上限时将执行对应命令将网速限制为 60KB/S,如此可以实现 SSH 登录 VPS,也可以降低流量损耗;一段时间后如果24小时内流量使用小于上限,带宽将恢复
import datetime
import json
import commands

# vnstat 2.6 and wondershaper must installed
# */1 * * * * python /home/xxx/tmp/net_monitor.py
valid_itf_id = "eth0"
daily_max_traffic = 3.0 # GB

cmd_traffic = 'vnstat --json d 1'
vnstat_res = commands.getoutput(cmd_traffic)

net_info_jsn = json.loads(vnstat_res)
valid_itf = None
for interface in net_info_jsn["interfaces"]:
    if interface["name"] == valid_itf_id:
        valid_itf = interface

log = open("/tmp/net_monitor.log", "a")
time_str = datetime.datetime.now().strftime('%Y-%m-%d %H:%M:%S')

if valid_itf != None:
    day_traffic_tx_gb = valid_itf["traffic"]["day"][0]["tx"]/(1024.0*1024*1024.0)
    tmp = ""
    if day_traffic_tx_gb > daily_max_traffic:
        limit_cmd = "/sbin/wondershaper " + valid_itf_id + " 480 480" # tx/rx 60KB/s
        tmp = commands.getoutput(limit_cmd)
        if len(tmp) == 0:
            tmp = limit_cmd
    else :
        clear_cmd = "/sbin/wondershaper clear " + valid_itf_id
        tmp = commands.getoutput(clear_cmd)

    res = str(day_traffic_tx_gb) + "|" + tmp + "\n"
    log.write(time_str + "|" + res)
else :
    log.write(time_str + "|no such interface: " + valid_itf_id + "\n")

log.close()
主机掉线短信通知
利用阿里云或者其他平台提供的短信服务可以实现服务掉线报警,这里掉线的是家里的闲置 PC,阿里云 VPS 掉线一般是商业事故,暂时不考虑这种问题。我的思路如下:
- 闲置 PC 安装 echo server,实现类似于 ping 一样的服务,可以考虑安装 docker 版本的 echo server 或者直接使用 python 命令创建 http 服务:
python3 -u -m http.server 8000 2> http.log - 利用 FRP 将闲置 PC 中 echo/http server 端口引入到 VPS 中
- crontab 周期性请求 echo server,请求异常则报警(下面脚本间隔 1200s 发送一次短信),Python 脚本如下,我使用的是阿里云的短信通知服务
示例配置(ini file):
[secret]
ACCESS_KEY_SECRET=xxxxxxx
ACCESS_KEY_ID=yyyyyyy
SMS_TMPL=SMS_123
URL=http://xyz.xyz:61000
TO=131xxx2298
SMS_TMPL_NAME=xxx
SVR_NAME=xxx
Python 脚本:
#!/usr/bin/env python
# coding: utf-8

import requests
import configparser
import time

def simple_get_request(url, kvs = {'echo_body':"xyz"}):
    r = requests.get(url = url, params = kvs, timeout=5)
    return r.text

def check_online_once(url):
    try:
        val = "sta"
        res = simple_get_request(url, kvs = {'echo_body':val})
        return res.find(val) != -1
    except:
        return False

def is_online(url, try_cnt = 3):
    for i in range(try_cnt):
        if check_online_once(url):
            return True
        else:
            time.sleep(5)

    return False

def read_conf(path):
    config = configparser.ConfigParser()
    config.read(path)
    kv = dict()
    kv["ACCESS_KEY_ID"] = config['secret']['ACCESS_KEY_ID']
    kv["ACCESS_KEY_SECRET"] = config['secret']['ACCESS_KEY_SECRET']
    kv["SMS_TMPL"] = config['secret']['SMS_TMPL']
    kv["URL"] = config['secret']['URL']
    kv["TO"] = config['secret']['TO']
    kv["SMS_TMPL_NAME"] = config['secret']['SMS_TMPL_NAME']
    kv["SVR_NAME"] = config['secret']['SVR_NAME']

    return kv

secret_kvs = read_conf("/root/crontabs/sms_secret_key.ini")

# https://github.com/micro-services-hub/aliyun-python-sdk-dysmsapi
import sys
import json
import uuid
import os

from aliyunsdkdysmsapi.request.v20170525 import SendSmsRequest
from aliyunsdkdysmsapi.request.v20170525 import QuerySendDetailsRequest
from aliyunsdkcore.client import AcsClient
from aliyunsdkcore.profile import region_provider

REGION = "cn-hangzhou"
PRODUCT_NAME = "Dysmsapi"
DOMAIN = "dysmsapi.aliyuncs.com"

ACCESS_KEY_ID = secret_kvs["ACCESS_KEY_ID"]
ACCESS_KEY_SECRET = secret_kvs["ACCESS_KEY_SECRET"]

acs_client = AcsClient(ACCESS_KEY_ID, ACCESS_KEY_SECRET, REGION)
region_provider.add_endpoint(PRODUCT_NAME, REGION, DOMAIN)


def send_sms(business_id, phone_numbers, sign_name, template_code, template_param=None):
    smsRequest = SendSmsRequest.SendSmsRequest()
    smsRequest.set_TemplateCode(template_code)
    if template_param is not None:
        smsRequest.set_TemplateParam(template_param)
    smsRequest.set_OutId(business_id)
    smsRequest.set_SignName(sign_name);
    smsRequest.set_PhoneNumbers(phone_numbers)
    smsResponse = acs_client.do_action_with_exception(smsRequest)

    return smsResponse

ts_file_name = "/tmp/sms_send_flag_" + secret_kvs["SVR_NAME"] + ".log"

def send_sms_and_mark(business_id, phone_numbers, sign_name, template_code, template_param=None):
    with open(ts_file_name, "w") as file:
        file.write(str(int(time.time())))

    send_sms(business_id, phone_numbers, sign_name, template_code, template_param)

def need_send(secs=600):
    if not os.path.exists(ts_file_name):
        return True
    last_send_ts = 0.0
    with open(ts_file_name, "r") as file:
        data = file.read()
        last_send_ts = int(data)
    curr_ts = int(time.time())
    need_send = curr_ts - last_send_ts > secs
    print("last {}, curr {}, need send: {}".format(last_send_ts, curr_ts, need_send))
    if need_send:
        return True
    else:
        return False

online_flag = is_online(secret_kvs["URL"])
if not online_flag and need_send(1200):
    curr_time_str = time.strftime('%Y-%m-%d %H:%M:%S', time.localtime())
    params =  {"name": secret_kvs["SVR_NAME"], "hours":curr_time_str}
    send_sms_and_mark(uuid.uuid1(), secret_kvs["TO"], secret_kvs["SMS_TMPL_NAME"], secret_kvs["SMS_TMPL"], params)

print("{} is online: {}".format(secret_kvs["SVR_NAME"], online_flag))
安装示例
Seafile
seafile 专业版 可免费用于不多于三个用户的场景。访问专业版页面需要将页面语言改为英文。使用 docker-compose.yml 是最简单的安装方法
组件
- MySQL
可以从国内镜像或者官网下载,最好安装 5.7 版本,安装可参考这里。此外还需要判断 win 防火墙是否放行
mysql 的安全设置比较麻烦,默认配置可能不支持 root 登录,需要修改并允许 root 登录,细节可参考其他资料 。默认密码修改可以参考这里
- OnlyOffice
OnlyOffice 社区版 可用于免费预览与编辑 Office 文档。seafile 安装与开启 onlyoffice 支持请参考这里
# 拉取 onlyOffice 镜像并运行
docker run -i -t -d -p 8702:80 --restart=always onlyoffice/documentserver
seafile 设置 onlyoffice api 地址时需要确定地址是可以访问的,即下面的配置:
ONLYOFFICE_APIJS_URL = 'http{s}://{OnlyOffice domain or IP}/web-apps/apps/api/documents/api.js'
- 其他
pro 版 seafile 自身包含了 5.6 版本的 ES 所以不需要额外安装
- 安装 seafile
先按照官网的要求安装依赖,然后执行 setup-seafile-mysql.sh。pro 版本不支持 sqlite
常用命令如下:
seahub.sh start-fastcgi # 查看详细错误
配置
- 如果希望网页端预览 office,请参考这里进行设置
- 开启 ES 搜索请参考这里
- 默认 seafile 的 8000 端口不对外开放,参考这里可以设置非 localhost 访问
- 开机启动请参考官网文档
开启 HTTPS
开启 Https 需要先申请通配符域名证书
使用 FRP 将内网中的 Seafile 服务端口引导到 VPS 中,随后就可以在 VPS 中通过配置 Nginx 实现 HTTPS 的外网访问。Seafile 配置 HTTPS 访问的方式可以参考官网。修改 proxy_set_header Host $host:CUSTOMPORT ,避免 CSRF 错误
FRP 内网配置示例
[seafile_8000]
type        = tcp
local_ip    = 192.168.8.114
local_port  = 8000
remote_port = 8000
use_encryption = true

[filebrowser_8080]
type        = tcp
local_ip    = 127.0.0.1
local_port  = 8080
remote_port = 8080
use_encryption = true
Nginx 配置示例
利用 Nginx 端口复用功能,只要修改 server_name 就可以在 80/443 端口同时向外提供不同的服务
###################################### Web
server {
    listen 443;
    server_name yearn.xyz;
    ssl on;

    ssl_certificate /etc/xxx/live/xxx/fullchain.pem;
    ssl_certificate_key /etc/xxx/live/xxx/privkey.pem;

    access_log /var/log/nginx/xxx.log;
    error_log /var/log/nginx/xxx.log;
    ssl_session_timeout 5m;
    ssl_protocols TLSv1 TLSv1.1 TLSv1.2;
    ssl_ciphers ECDHE-RSA-AES128-GCM-SHA256:HIGH:!aNULL:!MD5:!RC4:!DHE;
    ssl_prefer_server_ciphers on;

    root /root/web_data/static_web;
    index index.html;

    location / {
        try_files $uri $uri/ =404;
    }
}

server {
    listen 80;
    server_name yearn.xyz;
    rewrite ^ https://$server_name$request_uri? permanent;

    root /root/web_data/static_web;
    index index.html;
    location / {
        try_files $uri $uri/ =404;
    }
}

######################################### seafile

server {
    listen 443;
    server_name seafile.yearn.xyz;
    ssl on;

    ssl_certificate /etc/xxx/live/xxx/fullchain.pem;
    ssl_certificate_key /etc/xxx/live/xxx/privkey.pem;

    access_log /var/log/nginx/xxx.log;
    error_log /var/log/nginx/xxx.log;
    ssl_session_timeout 5m;
    ssl_protocols TLSv1 TLSv1.1 TLSv1.2;
    ssl_ciphers ECDHE-RSA-AES128-GCM-SHA256:HIGH:!aNULL:!MD5:!RC4:!DHE;
    ssl_prefer_server_ciphers on;

    location / {
        proxy_pass http://127.0.0.1:xxxx;
        proxy_set_header Host $host:443;
        proxy_set_header X-Real-IP $remote_addr;
        proxy_set_header X-Forwarded-For $proxy_add_x_forwarded_for;
        proxy_set_header X-Forwarded-Host $server_name;
        proxy_set_header X-Forwarded-Proto https;
        access_log /var/log/nginx/seahub.access.log;
        error_log /var/log/nginx/seahub.error.log;
        proxy_read_timeout 1200s;
        client_max_body_size 0;
    }

    location /seafhttp {
        rewrite ^/seafhttp(.*)$ $1 break;
        proxy_pass http://127.0.0.1:xxxx;
        client_max_body_size 0;
        proxy_set_header X-Forwarded-For $proxy_add_x_forwarded_for;
        proxy_connect_timeout 36000s;
        proxy_read_timeout 36000s;
        proxy_send_timeout 36000s;
        send_timeout 36000s;
    }
}

server {
    listen 80;
    server_name seafile.yearn.xyz;
    rewrite ^ https://$server_name$request_uri? permanent;

    index index.html;
    location / {
        try_files $uri $uri/ =404;
    }
}